My Go-To Artisan Sourdough Bread Recipe
Use this recipe as a guide to make delicious homemade sourdough bread.
Equipment
- Kitchen Scale
- Lame or sharp knife
- Dutch oven or oven-proof combo cooker
Ingredients
- 100 g Whole wheat flour
- 400 g Bread flour (10g protein content or higher)
- 380 g Water
- 100 g Active sourdough levain
- 12 g Salt
Instructions
- Autolyse: Combine both flours together with the water in a bowl until no dry bits of flour are left. Cover your bowl (with a lid, wet towel, plastic wrap, etc.) and let that sit in a warm place (about 25C/77F) for about an hour.
- Combine your starter: Pour the active sourdough levain on top of your flour and water mixture and with wet hands dimple and pinch it into your dough. You can mix it in various ways (rubaud method, continue to pinch, etc.). Once it has been incorporated cover your dough again and leave for 10 minutes.
- Add in the Salt: Measure and sprinkle the salt over the top of your loaf. Once again dimple and pinch to mix it in until it is all incorporated. If your dough is dry, you can add a tbsp more water to help mix in the salt. After it is all incorporated, cover your bowl and set it in a warm plac. Between 24C-27C/75F-80F (the warmer the temperature the faster it will ferment).
- Bulk Fermentation: Once all of the ingredients are combined, the bulk fermentation continues. You’ll perform 3 sets of stretch and folds at 30 minute intervals to help give your dough structure and help to further develop the gluten. If you only have time to do 1, that’s not a problem. In total, a warm bulk fermentation can last from 3.5 to 6 hours or more. Note: In my kitchen, when the temp is 27C or warmer it might ferment as quickly as 3 hours. Whereas if the temp is 23-26C it might take anywhere from 4-6 hours to ferment. It’s all about measuring the temperature of your atmosphere and seeing how your dough is affected.
- Pre-shape: Pre-shaping helps to give your dough even more structure and a bit of tension. Wet the counter with a spray bottle or just drop water down. Turn it out of the bowl onto the counter and fold the outside into the middle, flip it over and round it out. You want to add a bit of tension.
- Final Shape: Dry off your counter space and sprinkle a bit of flour down to prevent sticking. Fold your dough and place in your banneton. H or proofing basket. You can leave it to proof or you can let it sit and proof in the refrigerator to let the flavors develop even more. *Note: leaving it in the fridge also makes it easier to score and helps it to have more oven spring. If you choose to leave it in the fridge you can leave it anywhere from 2 to 48 hours.
- Bake: Preheat the oven with the Dutch oven inside to 250C/480F (If you have a small oven just 30 minutes, but if you have a larger oven 1 hour). Once the oven is hot enough, take the dough out of the fridge, turn it out onto parchment paper, give the dough a slice on the top (score) and place it in the Dutch oven and place the lid on top. Bake for 20 minutes with the lid on, then take the lid off to release the steam and get your crust crispy for 15 minutes and reduce the temp to 225C/435F. Then take it out of the Dutch oven, and place it alone on the rack for 15 minutes at 180C/350F.
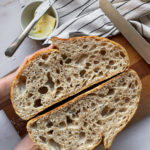
- Cool: Let your dough sit for 30 minutes to an hour at least. That is because the steam on the inside needs to move through the dough. So if you cut too soon the inside will be gummy and not as perfect as you’d hoped it would be, especially with whole grain bread.
Notes
Did you like this recipe? Have suggestions? Let me know with a comment below!